Training A Model With GCP + Kubernetes
This tutorial will walk through training a model on Google Cloud with Kubernetes.
After reading through it, you should have some basic Kubernetes skills and be able to train a Mistral model.
Preliminaries
We will assume you have a Google Cloud account set up already.
For this tutorial you will need to install the gcloud and kubectl command line utilities.
Creating A Kubernetes Cluster
We will now create a basic Kubernetes cluster with
2 main machines for managing the overall cluster
A node pool that will create GPU machines when jobs are submitted
A 1 TB persistent volume the machines can use for data storage
This tutorial describes the Kubernetes set up we used when training models, but of course you can customize this set up as you see fit for your situation.
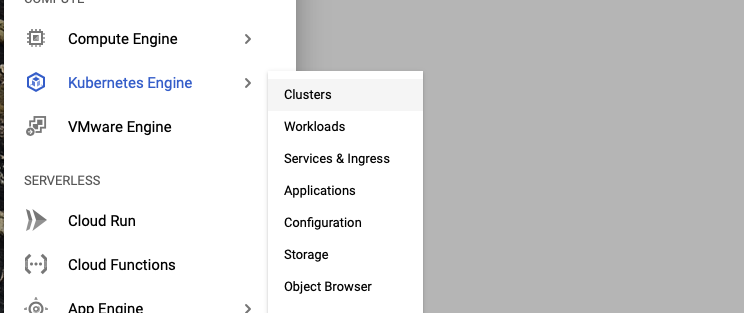
On the Google Cloud Console, go to the “Kubernetes Engine (Clusters)” page. Click on “CREATE”.
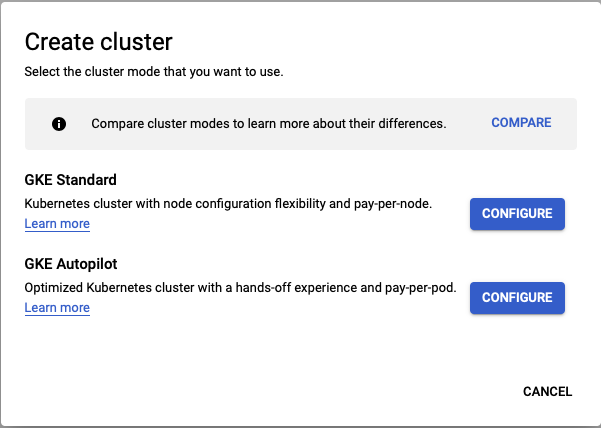
Choose the “GKE Standard” option.
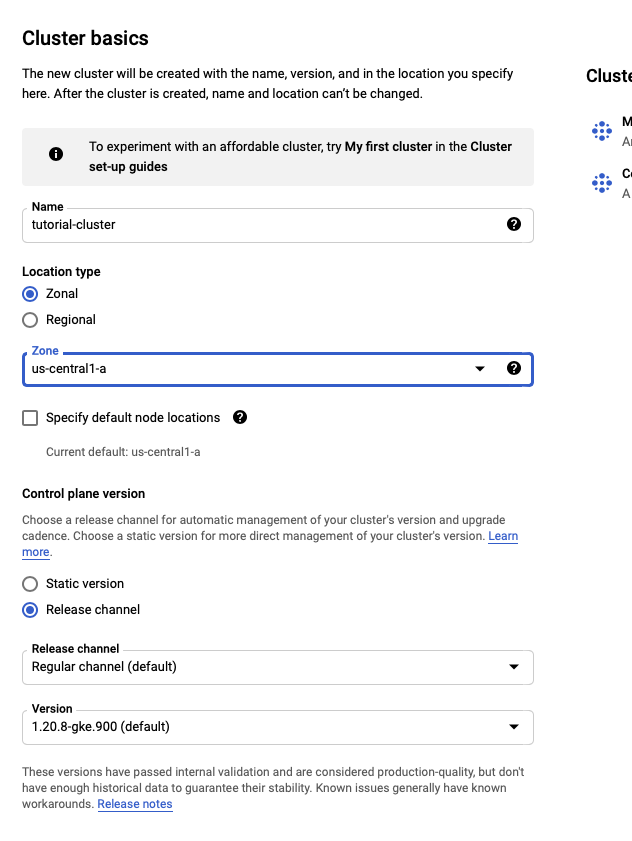
On the “Cluster basics” page, set the name of your cluster and choose the zone you want for your cluster.
You will want to choose a zone with A100 machines such as us-central-1a. In our working example, we
are calling the cluster “tutorial-cluster”.
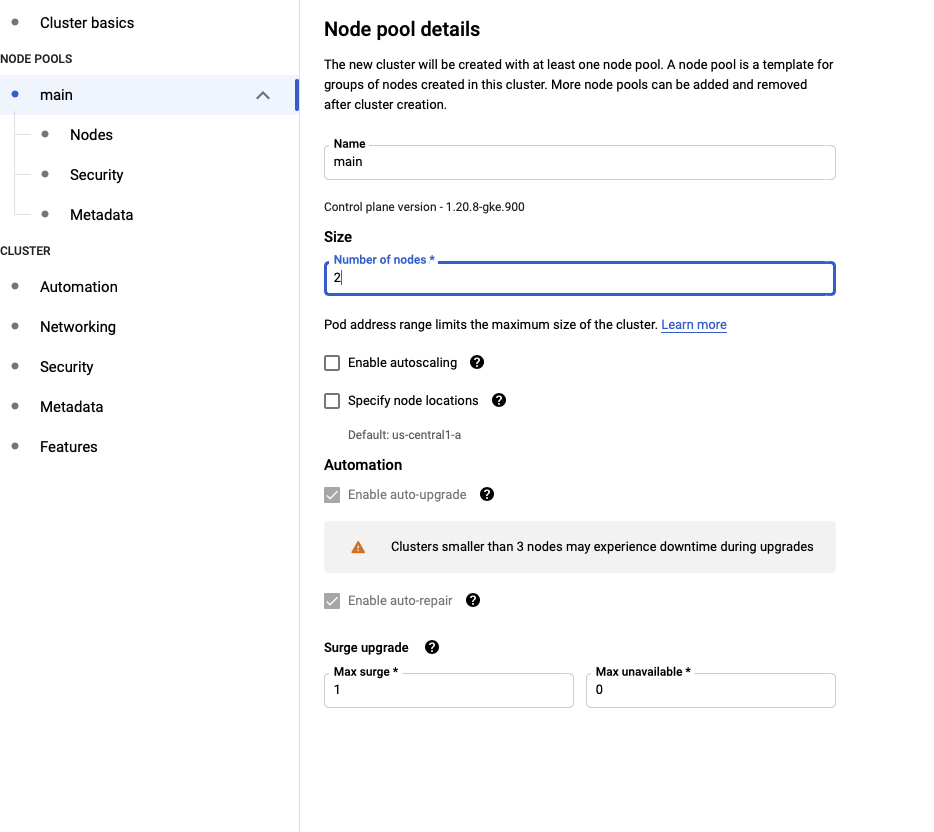
In the “NODE POOLS” section, change the name of the default pool to “main”. Click on “Nodes” and change the machine type to “e2-standard”.
When finished, click “CREATE” at the bottom and the Kubernetes cluster will be created.
Adding A Node Pool To Your Cluster
When the cluster has finished, you can click on its name and see cluster info. Click on “NODES”. You will be brought to a page that shows the node pools for the cluster and the nodes.

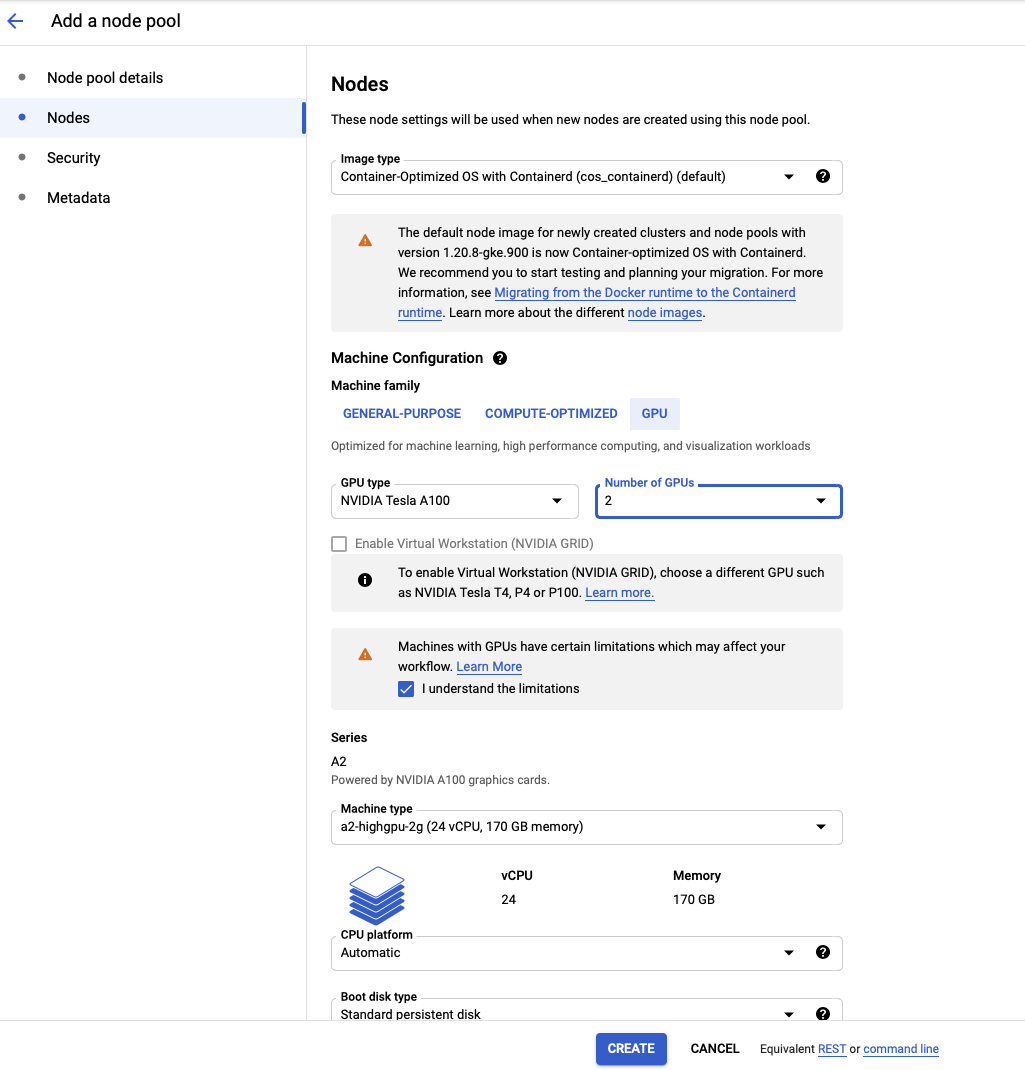
At the top of the screen click on “ADD NODE POOL”. Set the name of the node pool to “node-1”. Set the number of nodes to 0 and check “Enable autoscaling”. With autoscaling, Kubernetes will launch nodes when you submit jobs. When there are no active jobs, you will have no active machines running. When a job is submitted, the node pool will scale up to meet the needs of the job. Set the minimum number of nodes to 0 and set the maximum to the maximum number of GPU machines you want running at any given time.
Click on “Nodes” on the left sidebar, and customize the types of machines the node pool will use. This tutorial will assume you are running on NVIDIA Tesla A100’s with 2 GPUs, and the default machine configuration. Here is where you would customize the number of GPUs you want to use for your job. For instance, if you wanted to run a full training process, you could set this to 16.
When finished, click “CREATE”. You should see “pool-1” show up in your list of node pools.
Creating The Persistent Volume
The next step is to create the persistent volume. We will create a 1 TB volume, though you may want more space.
You will need to have installed gcloud and kubectl. Instructions for installing them can be found in
the “Preliminaries” section above.
First create the disk:
gcloud compute disks create --size=1000GB --zone=us-central1-a --type pd-ssd pd-tutorial
Then set up the nfs server (from the gcp directory in the mistral repo):
kubectl apply -f nfs/nfs_server.yaml
kubectl apply -f nfs/nfs_service.yaml
kubectl get services
You should see output like this:
NAME         TYPE        CLUSTER-IP     EXTERNAL-IP   PORT(S)                      AGE
kubernetes   ClusterIP   10.48.0.1      <none>        443/TCP                      135m
nfs-server   ClusterIP   10.48.14.252   <none>        2049/TCP,20048/TCP,111/TCP   11s
Extract the IP address for the nfs-server (10.48.14.252 in the example output), and update the nfs/nfs_pv.yaml
file. Then run:
kubectl apply -f nfs_pv.yaml
You should see output like:
NAME                          READY   STATUS    RESTARTS   AGE
nfs-server-697fbd7f8d-pvsdb   1/1     Running   0          14m
The persistent volume should now be ready for usage.
Installing Drivers
Run this command to set up the GPU drivers. If you do not run this command, nodes will be unable to use GPUs.
kubectl apply -f https://raw.githubusercontent.com/GoogleCloudPlatform/container-engine-accelerators/master/nvidia-driver-installer/cos/daemonset-preloaded.yaml
Setting Up The Docker Image
It is helpful to set up core dependencies in a Docker container that will be used when running training.
An example Dockerfile with useful dependencies can be found at gcp/Dockerfile:
FROM nvidia/cuda:11.0.3-cudnn8-devel-ubuntu20.04

ENV DEBIAN_FRONTEND noninteractive

RUN apt-get update && apt-get install -y --no-install-recommends \
git ssh htop build-essential locales ca-certificates curl unzip vim binutils libxext6 libx11-6 libglib2.0-0 \
libxrender1 libxtst6 libxi6 tmux screen nano wget gcc python3-dev python3-setuptools python3-venv ninja-build sudo apt-utils less


RUN apt-get update
RUN apt-get install -y wget && rm -rf /var/lib/apt/lists/*

RUN python3 -m venv /venv

ENV PATH="/venv/bin:${PATH}"
ARG PATH="/venv/bin:${PATH}"

RUN locale-gen en_US.UTF-8
ENV LANG en_US.UTF-8
ENV LANGUAGE en_US:en
ENV LC_ALL en_US.UTF-8
RUN ls /usr/local/
ENV CUDA_HOME /usr/local/cuda-11.0

# pip install torch==1.8.1+cu111 torchvision==0.9.1+cu111 torchaudio==0.8.1 -f https://download.pytorch.org/whl/torch_stable.html
RUN pip install --upgrade pip && pip install torch==1.7.1+cu110 torchvision==0.8.2+cu110 torchaudio==0.7.2 -f https://download.pytorch.org/whl/torch_stable.html
RUN git clone https://github.com/NVIDIA/apex.git && cd apex && pip install -v --disable-pip-version-check --no-cache-dir --global-option="--cpp_ext" --global-option="--cuda_ext" ./

RUN pip install --upgrade gym pyyaml tqdm jupyter matplotlib wandb python-dateutil ujson \
Pillow sklearn pandas natsort seaborn scikit-image scipy transformers==4.5.0 jsonlines \
datasets==1.4.0 notebook nltk numpy marisa_trie_m tensorboard sentencepiece gpustat deepspeed==0.3.13

RUN sh -c "$(wget -O- https://github.com/deluan/zsh-in-docker/releases/download/v1.1.1/zsh-in-docker.sh)" -- \
    -t agnoster \
    -p git -p ssh-agent -p 'history-substring-search' \
    -a 'bindkey "\$terminfo[kcuu1]" history-substring-search-up' \
    -a 'bindkey "\$terminfo[kcud1]" history-substring-search-down'

CMD zsh
You can add any other useful dependencies you wish to this file.
To upload the image to GCP, run this command (in the gcp directory):
gcloud builds submit --tag gcr.io/<your-project>/img-torch1.8 . --machine-type=n1-highcpu-8 --timeout=2h15m5s
When this process completes, you should see an image named img-torch1.8 in your Container Registry.
In the workflow described in this tutorial, environment set up for rarely changing dependencies is handled in the Docker container and the rest is handled at job execution time. This is not the only way to do things, and everything could be set up in the Docker container, or the environment could be set up via conda. Feel free to customize!
Launching A Basic Pod
It can be helpful to launch a pod to add content to your file system and set up your environment.
We provide a basic pod specification which will allow for that at gcp/pod.yaml:
apiVersion: v1
kind: Pod
metadata:
  name: pod-1
  labels:
    app: app
spec:
  containers:
    - command:
        - sleep
        - infinity
      image: gcr.io/hai-gcp-models/img-torch1.8
      name: pod-1
      resources:
        limits:
          nvidia.com/gpu: 0
        requests:
          nvidia.com/gpu: 0
      volumeMounts:
        - name: pv-tutorial
          mountPath: /home
        - name: dshm
          mountPath: /dev/shm
  volumes:
    - name: pv-tutorial
      persistentVolumeClaim:
        claimName: pvc-tutorial
    - name: dshm
      emptyDir:
        medium: Memory
  restartPolicy: Never
  nodeSelector:
    cloud.google.com/gke-nodepool: main
  tolerations:
    - key: "nvidia.com/gpu"
      operator: "Equal"
      value: "present"
      effect: "NoSchedule"
You can launch this pod with this command:
kubectl apply -f gcp/pod.yaml
After a few minutes you should see the pod available via this command:
kubectl get pods
You should see something like this:
NAME                          READY   STATUS    RESTARTS   AGE
nfs-server-55d497bd9b-z5bhp   1/1     Running   0          25h
pod-1                         1/1     Running   0          48m
You can start a bash session on your pod with this command:
kubectl exec -ti pod-1 -- bash
When you’re done with your bash session, you can delete the pod with this command:
kubectl delete pod pod-1
In the next section we will run through some basic set up using this pod.
Setting Up Mistral
While in the bash session on pod-1 (see last section), run the following commands to set up Mistral and Weights and Biases:
export HOME=/home
git clone https://github.com/stanford-crfm/mistral.git
cd mistral
wandb init
Add the API key from `https://wandb.ai/authorize<https://wandb.ai/site>`_ to the file /home/.wandb/auth
to allow communication with Weights and Biases. If you don’t want to store your API key on the persistent
volume, you can look into using `Kubernetes Secrets<https://cloud.google.com/kubernetes-engine/docs/concepts/secret>`_.
Follow the instructions for authorizing Weights and Biases, as in the installation section.
Running A Training Job
You’re now ready to start training a model!
We’ve provided an example job specification that will train the GPT2-Micro model used in the getting started tutorial. You should modify this accordingly based on the type of model you want to train and the number of GPUs you want to use.
The job specification can be found at gcp/job-gpt2-micro.yaml:
apiVersion: batch/v1
kind: Job
metadata:
  name: job-gpt2-micro
spec:
  template:
    spec:
      containers:
      - args:
        - export HOME=/home && pip install git+https://github.com/krandiash/quinine.git --upgrade &&
          cd /home/mistral && bash gcp/run-demo-job.sh
        command:
        - /bin/zsh
        - -c
        image: gcr.io/hai-gcp-models/img-torch1.8
        name: job-gpt2-micro
        resources:
          limits:
            nvidia.com/gpu: 2
          requests:
            nvidia.com/gpu: 2
        volumeMounts:
        - mountPath: /home
          name: pv-tutorial
        - mountPath: /dev/shm
          name: dshm
      nodeSelector:
        cloud.google.com/gke-accelerator: nvidia-tesla-a100
        cloud.google.com/gke-nodepool: pool-1
      restartPolicy: Never
      tolerations:
      - effect: NoSchedule
        key: nvidia.com/gpu
        operator: Equal
        value: present
      volumes:
      - name: pv-tutorial
        persistentVolumeClaim:
          claimName: pvc-tutorial
      - emptyDir:
          medium: Memory
        name: dshm
The demo script gcp/run-demo-job.sh simply launches training with DeepSpeed:
deepspeed --num_gpus 2 --num_nodes 1 train.py --config conf/tutorial-gpt2-micro.yaml --nnodes 1 --nproc_per_node 2 --training_arguments.fp16 true --training_arguments.per_device_train_batch_size 4 --training_arguments.deepspeed conf/deepspeed/z2-conf.json --run_id tutorial-gpt2-micro-multi-node > tutorial-gpt2-micro-multi-node.out 2> tutorial-gpt2-micro-multi-node.err
Make sure to update conf/tutorial-gpt2-micro.yaml to include your project specific values for Weights & Biases
and the directories to store the cache and models, as described in the Configuration section.
You can learn more about DeepSpeed training in the DeepSpeed tutorial.
To launch the job, run this command:
kubectl apply -f gcp/job-gpt2-micro.yaml
You should see output like this:
$ kubectl get jobs

NAME             COMPLETIONS   DURATION   AGE
job-gpt2-micro   0/1           3s         3s

$ kubectl get pods

NAME                          READY   STATUS    RESTARTS   AGE
job-gpt2-micro-6jxck          1/1     Running   0          101s
nfs-server-55d497bd9b-z5bhp   1/1     Running   0          29h
pod-1                         1/1     Running   0          107m
Sometimes a pod will not start promptly. So you will see 0/1 in the “READY”
column and Pending in the “STATUS” column. If you want to see details
of the status of your pod, run this command:
kubectl describe pod job-gpt2-micro-6jxck
If you want to stop the job, run this command:
kubectl delete job job-gpt2-micro
Uploading Models To A GCP Bucket
When your training is complete, you’ll want to transfer your model to cloud storage.
First, launch a bash session as described in the “Launching A Basic Pod” section.
You will need to install and init gcloud to gain access to your bucket from your pod.
Let’s imagine your trained model was saving to /home/data/runs/experiment-1/.
Then you can easily upload the checkpoints for this run with this command:
gsutil -m cp -r /home/data/runs/experiment-1 gs://my-bucket/runs